Showing posts with label Nails. Show all posts

KOTD: Lavender Lace

Last week I came across some cute nail polish colors by Vogue Fantastic. In case you didn't know, Vogue is a South American brand- made in Colombia. I'd secretly been holding off on posting swatches seeing as my nails are rather short at the moment, but then I decided I didn't really want to wait for weeks till they grew out. Once they do, I'll post updated pics and better Konad nail art looks.

I got 3 colors, my favorite has to be FRESH PETALS, a light purple hue, that reminds me so much of Mac's Limited Edition Lavender Whip lipstick. I have it on my toes too, and it looks slightly pink against my tan skin.

Paisaje, Fresh Petals and Mandarina
(I was really kicking myelf for buying Paisaje, since it comes with a nail art brush, not a nail polish one. I'll have to find an alternative brush for it I guess so it doesn't go to waste. So if you don't want nail art laquers, stay away from the pink bottle tops.)
Check out my Konad Look using Mandarina here.

Product claims:
"Long lasting, Fast drying and Glossy."

Pro's:
-relatively inexpensive
-a few cute colors

Con's:
-you'll need at least 2-3 coats to get good, even coverage.
-limited colors available


Newho, without further a do here is the nail swatch:
VOGUE Fantastic in Fresh Petals (23):

Oh yea, and it retails for about $2.50.

I used the Konad M57 Plate, my Wet N Wild White Creme Nail polish along with Vogue Fresh Petals to achieve this simple look- which is great for short nails:


KOTD: Purple summercat

It's summer and I've been going crazy with every bright nail polish in sight..Here's a purple Konad zebra/animal print I did... taken the day after.

Using: Jordana in "Black" and "Love Bug", Konad M78 plate


Konad M78

This plate was really easy to use and get fool proof results. It may be a problem for people who have really long nails though. Mine are short-medium lenght, but if they where a few millimeters longer the print may not have covered the entire nail.


Oriental KOTD

Before:

After:

Using: Jordana in "Grape" and "Black", Collection 2000 in "Spangles", M21 Plate, S4 Plate


Also, I just found out that as of March 2010, Konad suppliers have banned online sellers from giving out discount codes. Booo.. Just as I was getting excited to order my next batch of plates.


Hot Pink Zebras

I never was one who could be bothered to do her finger nails, but since I've gotten my hands on the Konad Nail Art system, I've been looking for excuses to change up my nail polish as much as possible, ha.

Of course, I couldn't NOT try out a hot pink zebra look:


I used 2 coats of Jordana Nailpolish in "Flamingo Pose" and "Black" and the Konad M57 Plate.
If you're an animal print lover like me, this is probably the one plate you really want to have in your collection. It also contains a cheetah print design. :)


As you may tell my ringfinger turned out a bit smudged and I didn't have time to do it over. (On camera it's much more obvious than in person... plus I'll probably make an excuse to re do my nails tomorrow.)
M57


Konad Haul

I was so exstatic when I finally received my Konad Nail Art supplies in the mail the other day. Due to a boatload of school projects that had to be tended to first, I only got around to trying the Konad today. And yes... I can say it IS worth the money. I was dying to try the other designs out on my sister or ANYbody else for that matter.

I ordered from OCNailArt.com, and thanks to entering the coupon "scrangie" at checkout managed to save a whopping 30% ($25!!). My order came out to about $58 total.

Here's the HauL:
-M57
-M21
-M78
-S9
-S5
-M56
-M44
-Nail Stamping Kit D (which comes with 2 nail polishes, stamping kit and M3 plate)
-Black special polish
-Yellow special polish


And..... my first attempt at some easy nail art (it's not THE most creative, but hey.. nail stamping can be intimidating at first):

Using: "Spangles" by Collection 2000 and Jordana "Black" nailpolish, Konad M3 plate


Surprisingly enough, I didn't need to really use the black Special Polish to get it to show up. My regular drugstore one worked just fine.


Overall the kit is very easy to use, and all you have to really worry about is aiming the stamp so it lands on the right area of your nail.... before the polish dries. It takes a bit of practise, but nothing too complicated.
And.. my cleanup was quick and easy. Just make sure to have your nail polish remover and cotton pads handy so wipe clean the plates between stamping.

I can't wait to try some more looks to post for you guys.. ;)


Bargain Find: Jordana Basecoats

I did a post 2 years ago about my favorite budget friendly find: Wet N Wild base coat. It was great and only a buck. I never spend alot on basecoats- on topcoats Yes!
Whether you buy expensive or inexpensive basecoats, they're a must because they protect your nails and help manicures last longer.

Lately I've found another better brand that I've been blogging about: Jordana Cosmetics. I'm really drawn to their nail polishes and treatments -due to the polish formulas and packaging- and have grown to dislike Wet N Wild polishes after trying these. The brush allows for easier and smoother application since it's not too thin.

The basecoat I got is called Jordana Calcium Boost Basecoat with Calcium Gel. It leaves nails shiny and seems to actually strenghten my weak nails. Love it. Oh and did I mention it only cost $2?


I'll be doing swatches of these soon...
(I did a review for the last one on the right here - called Red Of Hearts)


What's your all time favorite basecoat?


[All these products where bought by me, and this is my 100% honest review.]

Valentines day nails: Red hearts

My newest nail polish addition: Jordana Red Of Hearts. Usually I'm not a fan of clear glitter polishes as they seem a bit.. 90s? But when I saw this heart filled bottle, I had to have it.


Red Of Hearts is a clear base with a slight reddish tint, loaded with red sparkles and red heart-shaped glitter. If you want more glitter, you can build the amount with additional coats- perfect for layering over your favorite polish. There have been several polishes similar to this available in the past: Maybelline Deeply In Love ($3.50) and the 2009 collection Nicole by OPI ($8). None of these compare to the one from Jordana because mine only costs $2. :)


Now, when I tried to swatch this polish I realised it wasn't gonna be easy to apply. But here's a great tip: the hearts probably won't come out of the bottle when you use the brush- only the glitter. Apply as many coats of the polish as needed to achieve the glitter look you want.

Then, take a toothpick/stick and go fishing for hearts. It is much easier to pick them out of the bottle than it is to try to paint them on with the brush. Once you've gotten the heart onto the toothpick, gently press it onto your nail. Apply as many hearts as you wish then seal with a topcoat. The hearts and glitter actually stay on very well... a bit too well?

Here is my Valentine's day inspired look- obviously you'll have to ignore my messy application:

Essie Mint Candy Apple Review + Swatch

On my trip to LA, everywhere I turned I was haunted by images of this nail polish. I knew I had to have it.

As the name says, it's a mint green creme nail polish - and FYI: I heart creme nail polishes. This is lighter then MAC's Peppermint Patti which kind of dissapointed me at first, but I got over it. :)

Also, I used to find Essies brushes hard to work with- and seemed to get way too much polish on my brush resulting in alot of polish on my fingers. But nothing to worry about as I've finally gotten used to that and now truly love it, because you can get an opaque coverage with 2-3 coats.
Here's some nail art using Essie's Mint Candy Apple (via Nail Crack):

Have you tried this color?


Jordana (in Grape): easy Valentine's day nails

This is one of my favorite cheap nail polishes: the packaging and formula are amazing. The brush is just so well designed and provides ease of application (=very important to me). And these babies only cost $1.50! The only downside is the limited colors available compared to OPI and China Glaze.

I decided to do a Valentine's day inspired look using this polish and a bunch of heart shaped nail stickers I bought at Forever 21 for $1.80.

The nail polish glides on without streaking, and gives even coverage. I added a basecoat, then the Jordana nail polish in Grape. With the first coat I was good to go, but I wanted it to be neater and added another. With a good topcoat my nail polish was chip free for 2-3 days.

Nails on day 2 (click to enlarge)

Hot Valentine's day looks

Got a date planned? Planning to enjoy the day single, fabulous and with friends? Either way, Valentine's day isn't just for couples so make the best of it and overdose on chocolates. You can spend the day treating yourself, your parents or even friends to something nice.
This Youtube user has unfortunatly disabled embedding so check out these 4 looks by clicking on the links for some really easy DIY nail tutorials for Valentine's day:


Nail polish trends 2009: Metallics

What I love about nail polish is that you can keep your look up to date for a fraction of the cost, without giving yourself a make over. It's subtle, while still being a noticeable detail. Purples, red, burgundies where all covetted winter colors, but now it's time to break out the metallics.

Since being seen on fall runways, Silver nail polish has become a hot trend being worn by celebs (Rihanna, Lindsey Lohan, Paris Hilton, Kate Winslet) and the good news is metallics go with everything.

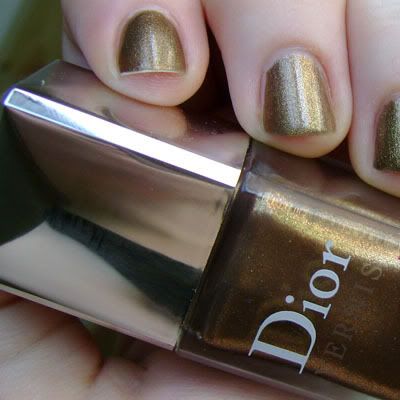
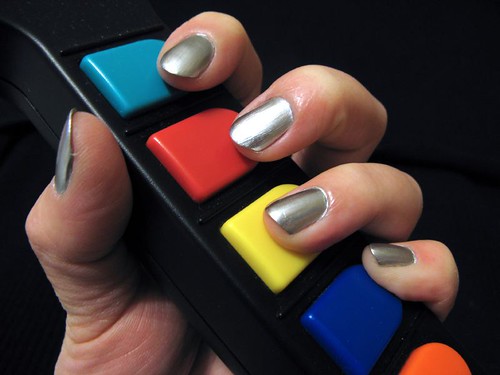
 If you're not into silver there's other choices like gold, graphite, chrome and bronze.

Rihanna loves her bronze and was seen sporting it since June '08:

Getting Started With Nail Art

Via Nail Crack
I did a nail art post some weeks back and decided to do another one. Decorating your fingernails is a quick way to spice up your wardrobe and your mood.
Step 1:
What you will need:
  • Colored nail polish.
  • Clear topcoat and basecoat.
  • Nail art glitter pen.
  • Nail glue.
  • Decals, stickers, confetti – whatever decorative pieces you want to use
  • Manicure sticks

Step 2:
Plan your design. I've made this mistake more times then I'd like to admit: you don't want to get stuck with glue on your nails before you realize that you hate your design or it doesn't fit. Assemble the decorative pieces you want on a flat surface, then lay them out for the look you want. Also, decide if you're going to decorate one nail to make a statement or if you want your entire set of nails to match.


Step 3:
Test design for fit. Fingernails vary in size (by individual and by finger): your pinky nail is smaller than your thumb nail. If you're doing a full set with the same design, test the design by holding it against your smallest and largest nails to determine if you like the look on each.

Step 4:
Prepare the surface. You can apply nail art to a nail already painted the color of your choice or a clear coat. Make sure that your nails are clean and dry before applying decorative items.

Step 5:
Adhere decals, stickers and/or confetti. Stickers, decals and confetti are available with or without sticky backing. The stickers are the easiest to use because they will stick directly to the nail without glue. If you need to use glue, use as little as possible. Put the decal onto the end of a manicure stick; apply a tiny dab of glue to the back, and then position the decal onto your nail. Press lightly with the stick and hold for a few seconds to set the glue.

Step 6:
Draw lines, outlines or shapes. Using a glitter pen or fine line polish, draw any additional design elements you want to add. Remember that your nail is a small canvas and you want to avoid cluttering the design with too much extra embellishment. I even like to plan this design ahead.

Step 7:
Apply top coat. Top coat should be applied once the decorative elements, glitter pen or glue have dried so they don't smudge and make all your hard work go to heck. Apply a layer of topcoat to seal in the design and create level surface. If you used rhinestones or thick decals you may need a second layer of topcoat to make sure it's properly sealed.

Step 8:
Sit back and let your nails to dry. Allowing nails to dry properly when you're done is important, but so is letting the polish dry between coats. If one coat isn't dry, the whole look will be ruined and won't dry at all.  


Review: Revlon Nail Prep Smoother

The tool is meant to keep your nail enamel smooth and chip-free longer by preparing nails before application. It's ergonomically–designed for greater comfort and contoured to nails for optimum smoothing.

How to use it?
1.Clean nails and push back cuticles


2.Using the lighter–colored side, briskly buff nails side to side across the nail surface.

3.Nails should be rid of surface imperfections and ridge–free. Follow the same motion with the darker side to prime nails for optimum polish application.


My experience:

I hate having to buff my nails, but love the results. This tool made it a BIT easier, and gave results it claimed: smoothed and prepped nails for polish. They weren't as shiny as regular nail
buffers leave my nails.

Rating: 3 out of 5 stars.
Would I buy it again?
I doubt it. It cost me $6 doesn't do much of a better job then regular nail buffers. As with all nail buffers it gets worn out too after a few uses.


Nail Art

Ever since I managed to quit nail biting, I've gotten into nail art. It's opened a whole new world of bright bold colors for me and my nailsI decided to invest in these cute nail gems which only cost me about $8 for 144 stones- from Broadway Nails. You get an assortment of shapes like heart, round, petal and flowers shaped stones as well as glue and a topcoat. I'm quite pleased with the results though I do need to get more creative with the patterns. The good thing is I may even be able to re use them if I take really good care of them.


Here's my how-to guide:
1. Apply a basecoat. I never knew how important this was til recently. It smooths ridges and makes nail polish go on smoother and stay on. If you missed it, here is my recommendation for a budget friendly basecoat.)

2. Apply 1-2 coats of your favorite polish. For more a more detailed explanation on applying nail polish perfectly go here. Make sure you let dry properly between coats. I usually just watch tv or go on the elliptical at home in between coats.

3. Apply the nail glue and (with tweezers apply) nail stones to your nails.

4. Sometimes I use gel pens. Metallic colored pens or even pastel to paint on patterns on nails. I find it easiest to work with patterns which include dots, not lines. Why? It's way too hard painting on lines with my left hand. I invested in a set of metallic gel pens with the colors silver, gold, blue, red, green, and purple.

5. Dab the topcoat- DON'T stroke the brush- onto the painted pattern. Stroking it over the pattern like you would with nail polish will smudge all your hard work. I recommend "Sally Hansen Hard As Nails" (about $2-3 and adds high shine).

6. Allow the dabbed on topcoat to dry then brush over all your nails with proper coating.


Here you can see I stuck a red heart-stone in the top corner and painted on 3 silver dots. Still working on getting more creative.


Here are some patterns you can recreate:


You can try these looks by buying nail stickers, glueing them on with adhesive then applying a top coat. Add stones to jazz up the nail stickers:


One more TIP: I recommend using more of the PASTEL pens, instead of metallic gel ones. For some reason, the metallic ones don't dry much, the pastel ones do! So every time I try doing my nails entirely with metallic red, blue, green, etc it smudges! Try doing a white flower and only a silver center for instance. Or add a stone in the middle instead.
Also, if you can it's always much easier to have a friend paint your left hand for you. That's why I stick with dot patterns: much easier to do with my left hand.


How To Stop Biting Nails And Grow Long Nails

I have never had the best nails; always a biter and when I finally stop the biting, they don't grow strong enough.

Atleast I finally figured out a way to grow my nails long and it's really a few very simple things you can do.

1. Keep reminding yourself NOT to bite them- and no I'm not being sarcastic. One option is to spend a few bucks on those bitter nail treatments: everytime you stick that nail near your mouth you'll be reminded right away to stop, by the bitter god awful taste. Just be carefull not to apply before eating fruit or other finger foods... I had to learn the hard way.


2. Get inspired by other people with pretty nails. I check out nail art pictures, beautifully painted and shaped nailes ever so often. The more new styles I see, the more I want to also be able to get the look.

3. Keep your nails painted and groomed. The day I decided enough was enough I bought a nail buffer, and gave myself a manicure. I buffed, filed and painted my nails with a clear, shiny coat. They looked better already and since then I did bite a few times, but trust me.. it's not even near noticeable. The more you take care of your hands and nails, the less damage you'll want to do to them.

4. Massage your nails with olive oil whenever you can. This boosts circulation and is said to help nails grow a bit quicker.

5. Milk is said to be good for nails so watch your diet. Eat/drink healthy.

6. Last but not least, this is the one thing which helped me more then all the others: I walk around everywhere with a nail file in my purse). Anytime my nail tears/begins to tear or if I bite it I stop any further damage then and there and "fix" it.Check out my other important tips when it comes to nails.


If you have long nails- what's your "secret" or #1 beauty tip?


NYC Times Square Tangerine Creme Nail Polish Swatch + Review

Recently I've been doing bright neon nails and couldn't resist picking up a bottle or Times Square Tangerine Creme nailpolish from NYC. (#112A).

I love the color. It looked even better on my toenails and it's so cheap too ($1.50). The color reminded me a bit of those orange traffic cones.

The downside??
It took me 3-4 coats to get it the color it's supposed to be and also to get full coverage. I hate unevennes.

Would I buy it again? For cheap nail polishes, I'm liking Wet N Wild Shine a bit better then this (though I haven't given other colors from NYC a shot; I'm open to it if the right color comes along haha). I bought the Wet N Wild "Dreamy Poppy" neon pink and that one went on so easily, and lasted too (with a proper topcoat).

The results:
Rating:
price: 5 out of 5
performance: 2 out of 5


Best Cheap Base Coat


Looking for a cheap (yet effective) base coat? I bought one today and I love it.

Fact: base coats makes polish last longer and prevent nail discoloration from using polishes. Use them alone and it gives a clean, natural finish.

Now I knowwww that Wet N Wild is considered "low quality" due to the price and to be honest most of the nail polishes do chip quickly. But I was quite happy with the results of this basecoat and give it 2 thumbs up!:) Invest in a good quality topcoat though.

Click here to see other nail treatment products from Wet N Wild Shine.


Hot Nail Color Trends


Hot colors this season are al bright- and even neon. The collections that have came out for Spring where mixed. Some companies are going all pale (Essie and Orly) while other companies are full of neons, holographic, and daring  colors (China Glaze).

OPI's collections usually are a mix of light and dark colors. Supplemental collections are more popular than ever. It seems like every month something new is coming out!
China Glaze just released three collections and are already planning three more for summer. The same goes for OPI.

 A French manicure is always appropriate and timeless. The dark navy blue trend is still going strong with the darker purples being pulled into the craze.


Leave it to Rihanna to be bold and daring on the Red Carpet. I soooo love this look with the blue dress vs. orange nails and can't wait for my nails to grow out a bit!;)

1. CND "Studio 54"
2. Color Club "Blue Light"
3. Finger Paints "Make a Scene"
4. CND "Hot Pop Orange"
5. China Glaze "Linger"


Make Your Manicure Last

I like to think of nails as a fashion ACCESSORY: they can add detail to your outfit.

I have short finger nails since I'm a nail biter, but I'm doing my best at the moment to grow them out at the moment so I can join in on the fun bright fingernail trend too!;) I also want to start doing at home nail deco once they grow a bit.


How to paint your nails so it will last:
1. To prepare nails: wash and use nail polish remover to get rid of any oil on nails.

2. Buff your nails, file the edges so the polish won' flake. Polish goes on smoother and sticks better to smooth surfaces.

3. Apply a base coat: it gives the nails something to cling to so that it lasts longer. Follow with two thin coats of polish in your fave color, then finish off with a quality top coat. Check out my top choice for cheap, effective base coat.
TIP: When you apply the top coat, be sure to run the brush horizontally across the tip of the nail with a bit of it going under the edge of the nail. This will help prevent peeling and seals the manicure properly.


4. It goes without saying that you should paint your nails only when you have time so you don't rush. Let your nails polish dry 5-10 minutes between coats. If the coat below isn’t completely dry before you add the next one, your nails won’t dry properly for quite a while, leading to chips and smudges. Grrrr!


MORE TIPS:
  • Don't use your nails as tools (e.g. for opening soda cans or picking at envelopes with your freshly painted nails.)
  • Instead of buffing you can use a coat of Ridge Filler (available from Sally Hansen and other brands).
  • Wear gloves to do housework and wash dishes.
  • Gently roll polish bottles it between your hands instead of shaking. This reduces chances of air bubbles forming- these can cause bumps when you apply the polish.
  • *If you're in a rush, plunge your nails into ice water for a few seconds between coats -this will quickly dry and seal the nail polish.
  • Glitter polishes stays on a few days longer.
  • Most brands only last a year before expiring, thickening and/or clumping. If nail polish is too thick it doesn't dry well.
  • Stay away from quick drying nail polishes unless you absolutely have to use them! The ingredients in them also cause nail polish to peel quicker. It's better to wait a few extra minutes and reap the benefits when your nail polish lasts days longer.
  • To keep your nail polish in top condition, refrigerate it in the summer. You should also clean the polish bottle carefully after each use by wiping the outside edge of the bottle with a cotton ball soaked in nail polish remover to keep the bottle from sticking shut.