Showing posts with label DIY. Show all posts

From Skirt To Dress.

Hello my darlings how is it all going with you?  I hope you are all well and happy.  I have seen this dress around and loved it, until I found out it used to be a skirt.  Now I adore it!  I do love a clever D.I.Y and this one is so simple and very effective.


This beautiful dress from...


...This old pleated skirt.  How clever is that and it is a really simple 1,2,3.


And this is the clever girl who came up with the idea, this is Sarah from Welcome to the gOOd life.  This DIY won the S.A Design contest and Sarah has many other clever and simple tutorials on her blog, I for won am signing up now so I don't miss any more of these brilliant ideas.  Oh she also made the necklace.

You can find the full tutorial for the skirt here, now I am off to find a pleated skirt in my wardrobe...


Have a wonderful Monday and Happy May Day to you all, can you believe that it is here already.  ax

All images from Welcome to the gOOd life.

DIY Easy Sew

Hello all, well it seems that early summer has arrived here and it is wonderful.  With my thoughts turning to summer clothes I was extremely happy to come across the great DIY dress from Style Scrapbook.


How simple and perfect is this for early summer?  I will not be going down the neon route but I do have a nice piece of Kelly green fabric that I think would work.  The full details of the DIY are here at Style Scrapbook
and although the lovely Andy did not add pockets I think I will.  

This idea is so simple and it has my head spinning with all sorts of variations, with t-shirts and vests as the top and maybe a few pleats or gathers and how great would this look on the little girls in our lives?  I am off to find though shirts in the back of my wardrobe and give this a try, I will post some photos of how mine turned out later in the week.  Will you be making one?  I think a nice big mans (husbands/boyfriends/dads) shirt would be a nice looser, comfortable option, just don't use his favourite one!


Happy Tuesday lovelies.  ax


Images: Style Scrapbook and streetfsn

This weekend I will be…

Christmas has finally come into my view, to this end I will be making and putting up the decorations this weekend.  I have spent a happy afternoon looking at Martha Stewart and getting lots of ideas, there are so many great ideas on there that I thought I would share my favourite ones with you.


So many great ones, bells, gumdrops, buttons and cotton wool balls.  I think I am going to make the pretty parcel one and I may display our cards in the fantastic peg and hoop style.  What about you, I have seen so many ideas around this year whats your favourite?


I am such a big fan of the baby sock advent calendar but am a little late this year, but I will definitely make it for next year.  I am also loving the crochet snow flakes but I will need to learn to crochet first.  Hehe.


Such wonderful trees, I am loving the seaside one with glittered shells.  How lovely is the fairy light tree, a great idea for small apartments.  I may also have to make the small gift parcel tree even if all my parcels are empty.


So many table ideas but I am loving the sweetie place settings, just card and ribbon so simple huh.  I am also thinking about the old magazine trees and those coloured ball cloches.  I love a dust easy display.


I currently have a couple of cute stockings but I may add to them (well the dog does need one) with the great old sweater idea.  I am sure the Mr will donate a sweater for a good cause.


Doilys, paper dics and pretty parcels oh my!  I want all of these and even though my pretty parcel tower may be all empty boxes, maybe Santa will get the hint and fill a few of them.

So how are your Holiday preparations going, do you make or buy your decorations, or do you just go out and leave all the bother behind?  All these great ideas are from Martha Stewart and she must start in February to make all these.  If you head over there you will find all the instructions on how to make these and many, many more lovely things.

I am wishing you all a lovely weekend if you have any snow where you are, keep warm, stay safe and go make a snow angel for me please.

Christmas Decoration Idea

Whilst reading the great blog almalus place yesterday I saw these wonderful balls.  I have seen them used for weddings and as lanterns and they always look amazing.  With Christmas just around the corner I thought these would be make wonderful decorations.  You can find the whole tutorial here at Ruffled.  They have used balloons but I was thinking for small tree decorations a tennis ball or ping pong ball would be ideal (cover the tennis ball in cling film first).

 Sorry I have just thought that using the balls will not work as you can not take them out afterwards!  Oh silly me!  Just use small balloons and do not blow them up to much.  hehe its always a live and learn life.


Then it is just a case of painting, metallic paints would look great and you can never have to much glitter.  Ribbon or string could be used to attach them to the tree, or just fill a large bowl and use as table decorations.  Once you start thinking about it the uses are endless!


Our tree is usually decorated with silver and white decorations but last year I added lots of brightly coloured feather butterflies that we had used at our wedding.  It was lovely to use them again and the bright pops of colour worked really well.  The colours are similar to those used as table decorations on the above photo.  I think these lovely snowballs are going to make a wonderful addition to our Christmas décor.

This weekend if I can get all the ingredients together to make these I will give it a go.  I will get back to you with the finished results.  Has anyone else got any Christmas crafts on the go?


Happy weekend everyone.

Mui Mui tights- How to

miumiudiy_0


Thank you to Michelle Elaine from FVNCY for giving me this brilliant idea to paint my own tights! I thought I would just write out what I did to compliment Michelle’s DIY :)

Before You Start


1. Familiarize yourself with painting swallows free-hand. Use any number of Miu Miu photos as a guide
2. Set aside TIME! It took me roughly 45 minutes to paint (and wait for the paint to dry) on one front leg.
3. Do NOT move/shift the tights once you start painting–this will distort your birds and ruin the work you’ve already accomplished!
4. Buy tights one size bigger (if you are not too petite). This will make the tights easier to take off once the paint has dried.

Paint Time!


1. Put tights on and start painting swallows densely. Minimize any goopiness as this will prolong the drying process
2. Take a blow dryer and apply heat (at low setting) directly above the swallow for 15-30 seconds–this is not intended to fully dry the paint, but to speed up the process
3. Apply clear nail polish once the paint has dried
4.Continue painting birds down leg, intermittently checking your progress in a full-length mirror to ensure that the distribution looks ‘right’
5. Continue blow drying all painted swallows to speed up the drying process
6. When the paint feels bone dry to the touch, start slipping your hands under the stocking and wedging your fingers in between your skin and the stocking. It may feel ’sticky’ here, but as long as you don’t see white paint on your leg, continue. Do this until you have peeled the entire stocking off

Et voila! C’est fini! For good measure, I recommend you allow the tights to further dry over night before doing the other side.
And on another note, I was just talking to my very talented friend Chantal from Cocorosa about the explosion of Miu Miu DIY’s in the blogosphere which was all kick started with her very own DIY (where she used stickers and jewels). You can see it HERE

DIY Slashed tights tutorial

You will need: A ruler or tape measure, tailors chalk or some other non-permanent way of marking your tights, small sharp scissors and a pair of old thick tights or new ones if you're brave (mine are at least 60 denier). The thicker they are the less likely they are to ladder once you've slashed them. Leggings would work too.

Step 1: Put your tights on.
Step 2: Mark lines across the middle of your leg where you want to make the slashes. I started mine at the thigh just low enough to be decent and marked lines 4cm (2") across with a 1cm (1/2") gap between each line. With hindsight I think this was a bit wide but it's totally up to you how wide you make your slashes and how far apart they are. It's not an exact process I really didn't do mine all that neatly. In fact I gave up using the ruler half way down my first leg and as you can see not all my slashed are the same length or the same length apart but it still works.
Step 3: Cut along you lines. Be careful not to cut or scrape your legs while cutting (like I did).

Ta Da! Done.

You could use some clear nail varnish around the edges of the slashes to make them more durable but I didn't bother. Although note that I haven't actually worn these out yet. I have no idea how long they will last.
Slashes can be worn at the front... ...or at the back.

Personally I prefer them at the back. From the front you are just wearing plain black tights then turn around and suddenly it's a very different look

Recycled tights necklace tutorial

Like any gal who lives in sub-zero temperatures I have a rather extensive collection of tights. Consequently I also throw many of them away when they get holes and ladders in them. I have zero patience which makes me rip them on too fast. This, coupled with a nasty habit of crawling around on the floor make my poor tights rarely last longer than a season. I was so upset when my yellow tights bit the dust recently and I decided it was far too soon for our relationship to end. So I shredded them to pieces and made a necklace out of them. I’m a heartless wench. 


 I just cut the legs off the body of the tights and cut the toes off.
Then I cut each leg open and cut them into strips, roughly 1cm wide.
Then I tied each end to an earring finding making sure that each layer was longer than the last. This sometimes meant tying two lengths together and trying it on to check that it was falling correctly.
Then I tied shorter pieces of stocking at irregular intervals along my strands. I also bought a DIY stud kit and put studs all along the strands and ties. I sewed a few silver charms on it too. 
Then I added a clasp and chain so I could wear it at different lengths. If you’re going to make this yourself I suggest that you wear it often through out the process of making it so you can gauge the shape and length of it. The total cost of the piece was $1.50. The tights, earring findings and chain were all junk that was lying around my house and the stud kit cost $1.50 from a discount store. Even if I had to buy the findings and chain it wouldn’t have cost more than a couple of dollars. 
This is the first D.I.Y post for Smaggle so if you have any questions just comment! 
Love Lady Smaggle
xxx

Two toned tights tutorial


Someone pmed me asking where I got my gold/silver tights from.
I'm actually wearing three separate tights in the picture above.
I found Jester tights on Ebay, but they lacked variety in color.
So I decided to make my own version.
I'm in class right now, but this is so easy that images aren't needed.

Materials:
no scissors
two colored tights
neutral/nude tights (but tight seamless/microfiber underwear (like Spanx) will do)

Steps:
1. Take one of the colored tights and invert one leg into the other, creating a single stocking.
2. Repeat step one with the other colored tights.
3. Put on the neutral/nude tights or spanx. This is your base.
4. Wear the colored stockings over so that it resembles leather "cowboy" chaps.
5.Tuck in the extra fabric on the top into the base.

Tips:
♥ Gather the material first before combining the legs.
♥ The inner edge of the stockings may lower throughout the day, so gather the fabric in such a way that more fabric is on the upper leg.
♥ Smoothen out the edges and make sure there is no unnecessary creases when tucking in.
♥ Choose a lower denier for your base if it's hot outside, since you are practically doubling the denier of the colored stockings.
♥ I suppose you can try this with leggings, but it may be a little bulky.
Bonus: layer on mesh (fishnet, lace, etc) tights on top!


Starmoss. Doo.ri tights DIY


doori
img_0586
What you’ll need: Patterend lace tights (or leggings), very thin needle, thread, scissors, and a set of beads varying from sizes to colours to shapes.
I chose two neutral colours (white and cream/gold), one complimentary (blue), one pot of sequin for the sparkle and a satin pearl pot for texture.
img_05932
Wearing the tights will be the easiest way to apply the beads.
img_06122
Find a patch on the lace where the texture is heavier (on the pattern – the weave is stronger there and should hold the beads better), and slide needle through where you want to start. (Please excuse my chipped nails)
img_06132
Pull the thread out to the necessary length needed for that section (usually 25-30cm) and make a firm double knot.
img_06152
Thread beads in and sew into the tights. Usually 4-5 beads per time is good for more control with the shape.
img_06161
img_06191
Keep varying between beads and sequins and other decorations – once an area is done, finish with a double knot. Snap off thread to start on new section.
Repeat. When doing the other leg, see how they balance out overall on both legs.
img_2689
img_2702
Tights H&M | Shoes Chloé
I went for a more royalty-inspired embellishment than the exact copy of Doo.Ri. It turned out to be quite sparkly in real life, so I didn’t have to do as much!
Advice on choice of tights & caring:
  • For this kind of beading (vines and chunks) better pick densely-woven tights like mine.
    If you want to do it Doo.Ri style, pick bigger sequins, beads and crystals on sparsely woven tights like bigger laces.
  • If you do choose to do it on lace tights, then wear socks over the feet to prevent them from getting dirty.
  • Handwash for cleaning. Avoid beaded areas.
  • You could even try lace leggings if you don’t feel like such delicate care.
  • Be gentle while putting it on!
Good luck!
Source http://www.parkandcube.com

DIY Chanel tights


Many of us have seen the double-sided Chanel tights. We've wanted them.The Fashion Spot has even had a thread dedicated to them. Of course, at $140 a pop, many will not get them.
Sure, I could wait for a knock-off (dropping in 3... 2... 1...), but knowing my impatience, I had to try my hand at making my own pair. Of course, given my lack of preparation and mismatching materials, the end result was quite sloppy and pretty much looked like a bad counterfeit. Therefore, I hereby dub this DIY: "The 'Channel' tights".
I didn't want to spend money on tights that I was pretty sure I'd ruin the first time around, so I rooted around the house and dug up these two disposable pairs:


Herein lied the most obvious problem. While the sheer nude tights were extremely tight and stretchy, the black ones were crochet, and completely stretched out so they were all big and loose.


Here, I've cut both tights along the sides. The only tricky part of this experiment was figuring out how to sew extremely stretchy fabrics together. In order to do so, you have to use astretch needle, and set the sewing machine on a zig-zag stitch, with a mid-sized stitch length, and the lowest tension setting. This is all pretty intuitive though.


Laying the tights on top of one another... starting to stitch the two fabrics together. In order to prevent slippage of the fabrics, I simply used binder clips to hold them together while I sewed. Elementary, yet effective!


Here I am pulling them on before sewing the foot shut... and final product (sorta).
Overall, since the textures of the tights were so different, the line of the stitch got all puckery, and ended up looking very sloppy. But since I did, indeed, figure out how to sew tights together effectively, I'd say the DIY was a sloppy success.


Aaaand here's what they look like! Paired with "matching" skirt and generic outfit, of course. You can obviously tell the stitch is kinda gross.
At any rate, this was just a test pair (or, as my sister says, a "rough draft"). Next time, I'm probably gonna buy two pairs of the same tights, to eliminate the texture problem. I'm lookin' at you, Urban Outfitters 2 for $20 tights deal.
Well, and I would post this to tFS, but seeing as I don't have an account... *cough* (just kidding... maybe....)

Source http://moohoop.livejournal.com

How to tie-dye tights


Did you dirty up the toes of your white hose? Give your old tights new life with a DIY dye job. All you need are white tights (no more than 50 percent polyester), rubber bands, fabric dye (we used RIT), an old, large pot (you won’t want to use it for cooking again), and old tongs or a wire hanger.

To create the design on the right in the photo, fold each leg of your tights accordion-style, from the toe to the crotch. Pinch the folded material, and secure both sides of each stack with rubber bands. In your pot, mix black dye (according to package instructions) and bring to just under a boil. Submerge your tights for about 15 minutes, stirring constantly with your tongs or hanger to ensure even coverage. Rinse with water (start warm and finish cool) until it runs clear. Remove the bands and lay flat to dry.

To make the design on the left in the photo, knot your tights wherever you want a stripe. Make the knots on each leg match up if you want the stripes to be even. In your pot, mix black dye and bring to just under a boil. Submerge your tights for 30 – 60 minutes, stirring constantly, and rinse. Untie any knots where you want a colored stripe. In your pot, mix fuchsia dye and bring to just under a boil. Submerge the tights for 30 minutes, stirring constantly, and rinse clean as above. Undo the remaining knots, and lay flat to dry.

New DIY Ripped Tights Tutorial by DirtyAddiction


What you need: 1 x pair of tights (nylon/spandex blend) 1 x seam ripper (available at any drug store) Where to buy the studded hair bow headband: http://purplelobster.etsy.com


DIY painted tights


Just found this at http://naughtysecretaryclub.blogspot.com

Oringina xo


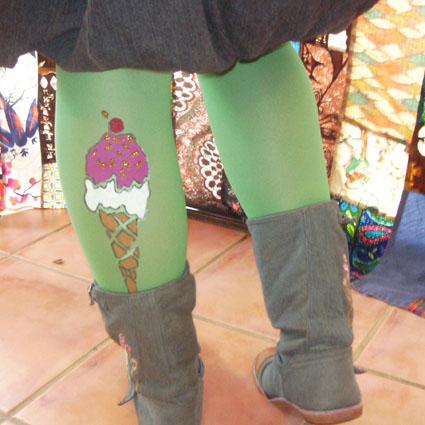
In case you have not heard, tights are all the rage. Embellished tights especially. I’m not sure I saw anyone ob the runway with ice cream cones on their calves, but today for I Love to Create this is the Naughty Secretary Club interepretation of the trend.


SUPPLIES

Paint Brush
Length of Calf Size Pipe
Fine Tip Permanent Marker
Tights
Embroidery Pattern or image from Coloring Book
Clear Tape


THE PERFECT ICE CREAM CONE

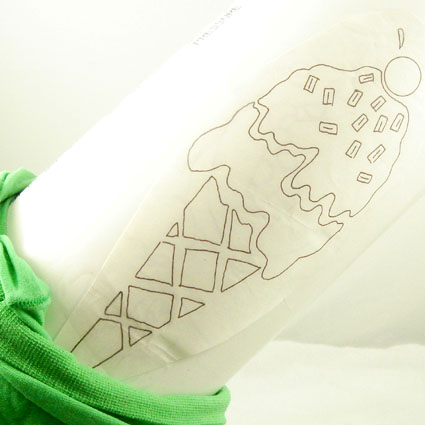
Choose the image you want on your tights. Make sure that it is not super detailed and will be easy to paint and trace. I found that embroidery patterns and coloring book pages work awesome.


PICK UP SOME PIPE

The hardware store is a wealth of crafty goodness. Hit the plumbing aisle for a length of tubing the size of your calf. Mailing tubes also work great.


TAPE IT DOWN

Using tape attach your embroidery pattern to your tubing. put on your tights and mark with a washable marker where you want the ice cream cone. Stretch your tights over the tubing lining up the design with the mark on your tights.


TRACE

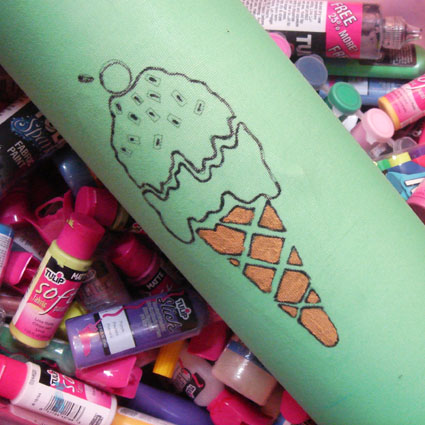
Use a fine tip marker to trace the image onto your tights.


PAINT IT SCRUMPTIOUS

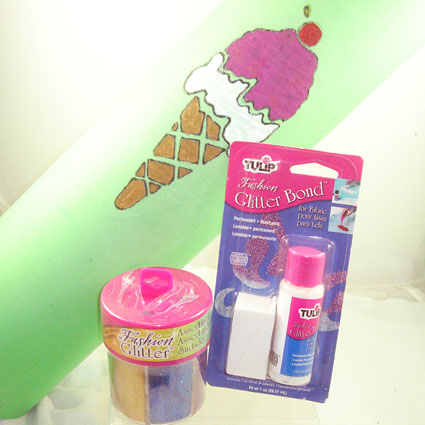
Using a paint brush and Tulip Soft Fabric Paint fill in the areas that you traced. A thin coat should work fine. Allow to dry completely.


GLITTERLISCIOUS

Using Tulip Glitter Bond and a fine tip paint brush apply little marks to the top of the ice cream cone the size of candy sprinkles. Generously apply glitter and allow to dry. Shake off excess.

Cute as can be and ready to wear. I might adorn myself a few more pairs of tights and leggins once the weather gets cooler. 

1

Clotheshorse DIY tights


I know the clotheshorse http://theclothes.blogspot.com/ posted this a while back but the project is similar to yesterdays post.


Oringina xo


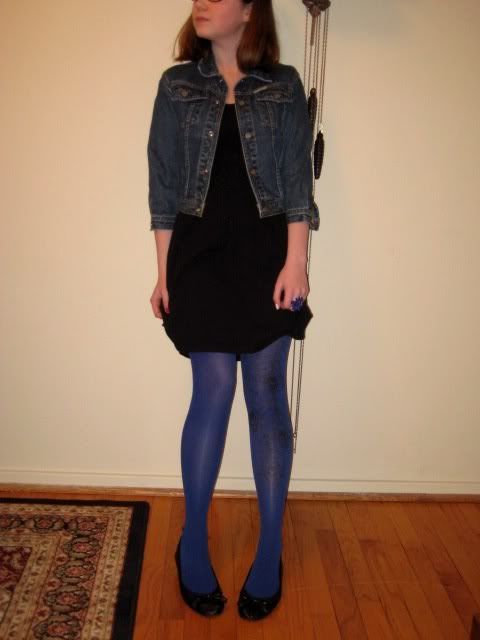
I finally got around to doing that D.I.Y. tights project I mentioned ages back. A brief visit to Target rewarded me with several pairs of tights for an average of $2.00 each. Most I don't think I will alter in any way, but I felt these bright blue ones would work well for my little project (yellow would have been better, but these would do).
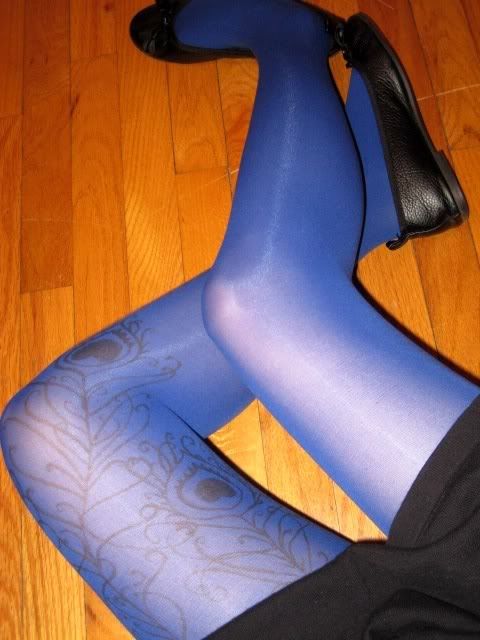
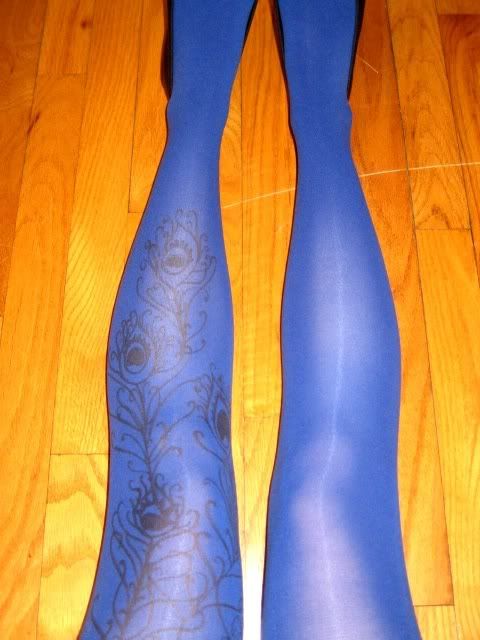
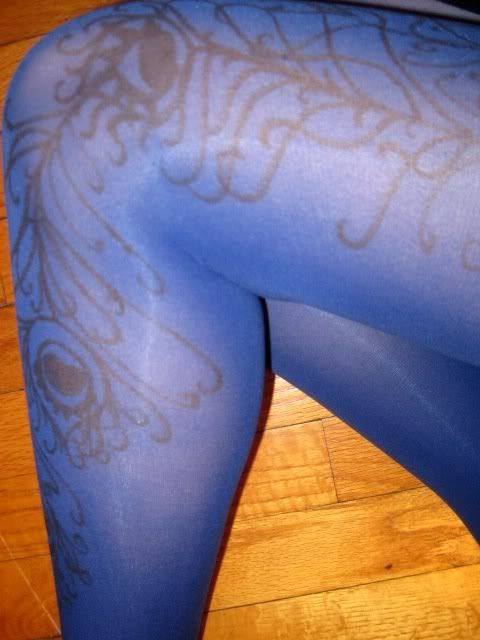
I couldn't quite figure out a way to give the tights the shape of my legs without wearing, so (against my previous instructions) I wore them while drawing on them! I layered a pair of black opaques underneath and used a sharpie marker to create the design. I may go in an darken the lines again, but they're darker than they appear in these images, since the flash alters the appearance of the tights somewhat.
So, here in all their symbolic vain glory are my new peacock feather tights:
theclotheshorse, daily, outfit, personal, style, thrifted, customisedtights, peacock, feathers, drawing, DIYtights, peacock, feathers, drawing, customizedtights, peacock, feather, fashion, style